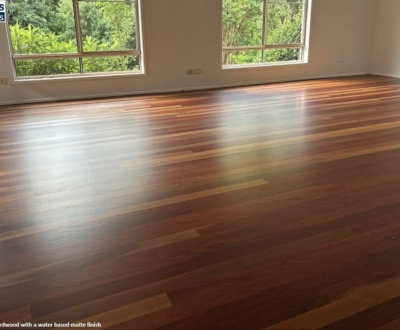
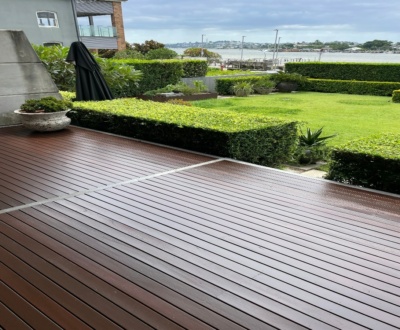
There is no better expression of the Australian way of life than a deck. They offer everything we love—a great outdoor living space, somewhere to keep the BBQ, and memory-making opportunities with family and friends.
But over time, even the sturdiest and most well-maintained timber decks will fade and begin to look worn, stained, scratched, or bleached from the elements. A timber deck needs proper care and maintenance to ensure it remains a long-lasting entertaining and relaxation space. Sanding and staining are crucial steps in enhancing its appearance, ensuring its longevity, and restoring its natural beauty. Decking isn’t cheap, so it deserves the best TLC possible, right?
It is recommended you have your deck restored by professionals, as they have the knowledge and skills to assess your deck and guide you through your choice of deck stain. They know how to apply stain in the right conditions to ensure maximum durability and protection, and most of all, they’ll save you time! However, if you are confident doing it yourself, here is a detailed guide to how to sand and stain a deck.
How to sand a deck

Sanding a deck before staining is the key to ensuring a great end result. It strips away any previously applied stain, evens out the colour and makes re-coating easier. It also removes damaged wood and splinters for a smoother finish. Ultimately, deck sanding and staining will protect your deck from UV rays, moisture, and other environmental factors.
1. Get your sanding tool kit sorted
Before you start, make sure you’ve got all your tools and materials ready to go, including:
- • Protective clothing
- • A dust mask
- • Eye protection
- • Hearing protection
- • Sun protection
- • A broom
- • A dustpan and brush
- • A hammer
- • A nail punch
- • A cork sanding block
- • Sand paper
- • A belt sander
- • A finishing sander
2. Inspect your deck for imperfections
The first step is to examine your deck for any imperfections, which can include warped or broken timber, or nails or screws that rise above the surface of your deck. With the latter, make sure they’re all countersunk at least a couple of millimetres below the level of the deck. This will alleviate any issues during the sanding process and further down the track!
3. Check the weather
Water can have a massive impact on a deck-staining project. If a deck is wet or has a high moisture content from rain, humidity, or dew, the stain won’t absorb properly, resulting in a less durable finish, uneven coverage, streaking, discolouration, and blotches. It can also affect the drying time. Check the weather a few days in advance, and don’t start until there are (quite a few) sunny days ahead!
4. Sand your deck
Before you sand and stain your deck, wear protective clothing, including closed-in shoes, a dust mask, eye protection, hearing protection, sunscreen, and a hat. Use a belt sander to sand large surfaces—this is an efficient tool that sands a large area of deck quickly. Work the sander backwards and forwards along the grain of the boards. If you’re removing existing deck coating or stain, start with a coarse grade of sandpaper, like 40 grit, then 80 grit, go over the surface again with a finer grade, like 120 grit, to create a smoother finish.
A finishing sander should be used in corners and on edges that the belt sander can’t reach. Don’t push down too hard—let the sander do the work for you. Again, if you’re removing existing paint or stains, start with a coarse sandpaper grade, then smooth the surface with a finer grade. When sanding railings, use 40, 80, to 100-grit sandpaper. Home improvement centres like Bunnings and hire companies will have a range of sanders you can hire. Because sanders are power tools with vibrating or rotating parts that can cause injury, we highly recommend getting advice on their operation before using them. Once you’re done sanding, sweep the deck with a broom, and you’ll be ready to stain!
How to stain a deck

Before we get into the details of how to stain a deck, what are some of the benefits? Staining a deck is not just about improving your deck’s colour, consistency and aesthetics. It can also offer:
- • Protection from the elements. This includes water resistance, which creates a protective barrier and prevents the wood from warping, rotting, and cracking. Many deck stains contain UV inhibitors, which protect the wood from the sun’s harmful rays. These can cause timber to dry out, fade, and degrade over time. Stain can also help reduce the growth of mildew and mould by making it less attractive to fungus and moisture.
- • Enhanced durability. The stain will penetrate the timber, helping it remain flexible and resistant to cracking and splitting. It will also give your deck a longer lifespan as it’s less likely to deteriorate.
- • Easy maintenance. A stained deck is easier to clean, as stains help to prevent debris and dirt from embedding into the wood. It will also be easier to wash down. This can also mean your deck will require less frequent maintenance, as it will only require a periodic reapplication of a stain rather than more expensive repairs over time.
- • Increased value. A stained deck can increase your home’s curb appeal, which can be an asset if you’re looking to sell it in the future.
- • Improved safety. Some deck stains contain slip-resistant additives, which are ideal if your deck is in a high-traffic area or tends to get wet.
1. Get your staining tool kit sorted
Again, make sure you’ve got all your tools and materials ready to go before you start, including:
- • Clean-up cloths
- • Lambswool applicator
- • Paint brush
- • Paint stirrer
- • Paint tray
- • Masking tape
2. Prepare your deck for staining
For your deck to absorb the stain, the timber needs to be clean, sanded, and ready to absorb it. The idea is to remove any grease, mould, algae, dirt, oil, wax, or stains—and a sweep alone won’t do it. Start with a sweep, then wash it with a deck cleaner and give it a good rinse with clean water. Ultimately, surface contaminants can spoil the finish of your stain.
3. Select a suitable stain
There are so many different stains available, from water and oil-based stains to different shades and stains with different drying times. But it’s an important decision, so take your time when choosing. We highly recommend speaking to an expert about the right stain for your needs. Preparation is key when it comes to knowing how to sand and stain a deck.
4. Apply the stain
Before applying the stain, cover any areas you don’t want stained with masking tape. Then, give your stain a good stir. This ensures all the pigment is evenly mixed throughout the tin and will help provide a consistent finish. Stain the edges and corners of the deck with a paintbrush. Use nice, long brush strokes, and blend in as you go.
Then, stain the large deck areas with a lambswool applicator. Dip it into the paint tray, taking a moderate amount of stain with each dip. Use long, even strokes to stain the timber, blending in as you go. Remember to finish on an open edge so you don’t paint yourself into a corner—literally!
5. Wait for it to dry
Deck stains typically dry in 24 to 48 hours, depending on the type of timber, humidity, and temperature. Once it’s dry, maintain your deck by cleaning it regularly. Decking oil and re-coating are also recommended for an instant refresh!
Ultimately, sanding and staining a deck can be more complex than it first seems. Professionals have honed their skills and techniques to ensure a long-lasting, successful result. Rather than risking it with a DIY route, we recommend consulting a professional!
Need more advice on sanding and staining a deck? Get in touch with the experts at Brisbane’s Finest Floors on 0411 220 488.
References
- Bunnings (2025), How to sand a deck, Bunnings article, accessed 31 March 2025.
- Bunnings (2025), How to stain a deck, Bunnings article, accessed 31 March 2025.
- Bunnings (2025), Tools 101: how to use power sanders, Bunnings article, accessed 31 March 2025.
Brisbanes Finest Floors, with over 20 years of experience in adding wow to any wooden floor, internal or decking.
Request a free quote
Talk to us today and discuss your floor restoration, repairing your deck and new flooring.